Building an open source IRL livestreaming backpack
Posted on 2022-08-18
This month I decided to build an IRL livestreaming backpack. Not with the desire to become an IRL streamer, but because I think it's a very fun technical challenge. I gathered and set up all the hardware, reverse engineered some firmware images, and coded my own software to control it.
Deciding on the hardware
To get started, I made a list of hardware I definitely need:
- Camera
- Small ARM-based computer
- 4G modem (and a good data bundle)
- Battery pack
- Phone to control stuff (I used my iPhone)
- Computer to stream to Twitch (I used my home PC)
This would be the bare minimum to get stuff working.
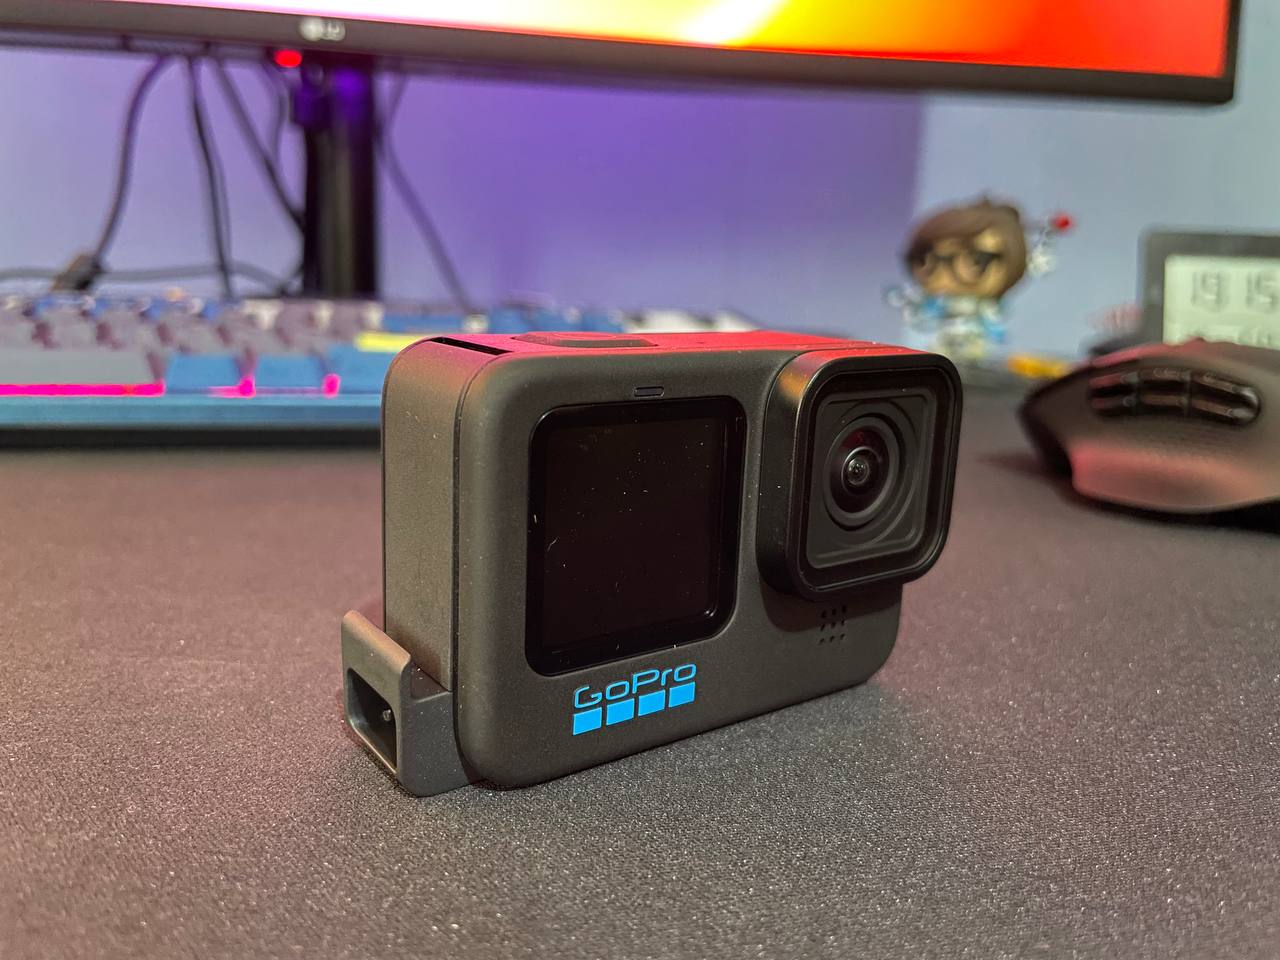
The camera
For the camera, I decided to go with a GoPro HERO 10, because it's a small portable action camera, and it actually has a USB interface which can make it act like a webcam. I ran into a number of peculiar quirks while setting this up, which I will go more in-depth about further down below.
I also needed the USB Pass-Through Door to make sure I could keep the USB connected to the GoPro without exposing the battery at all times.
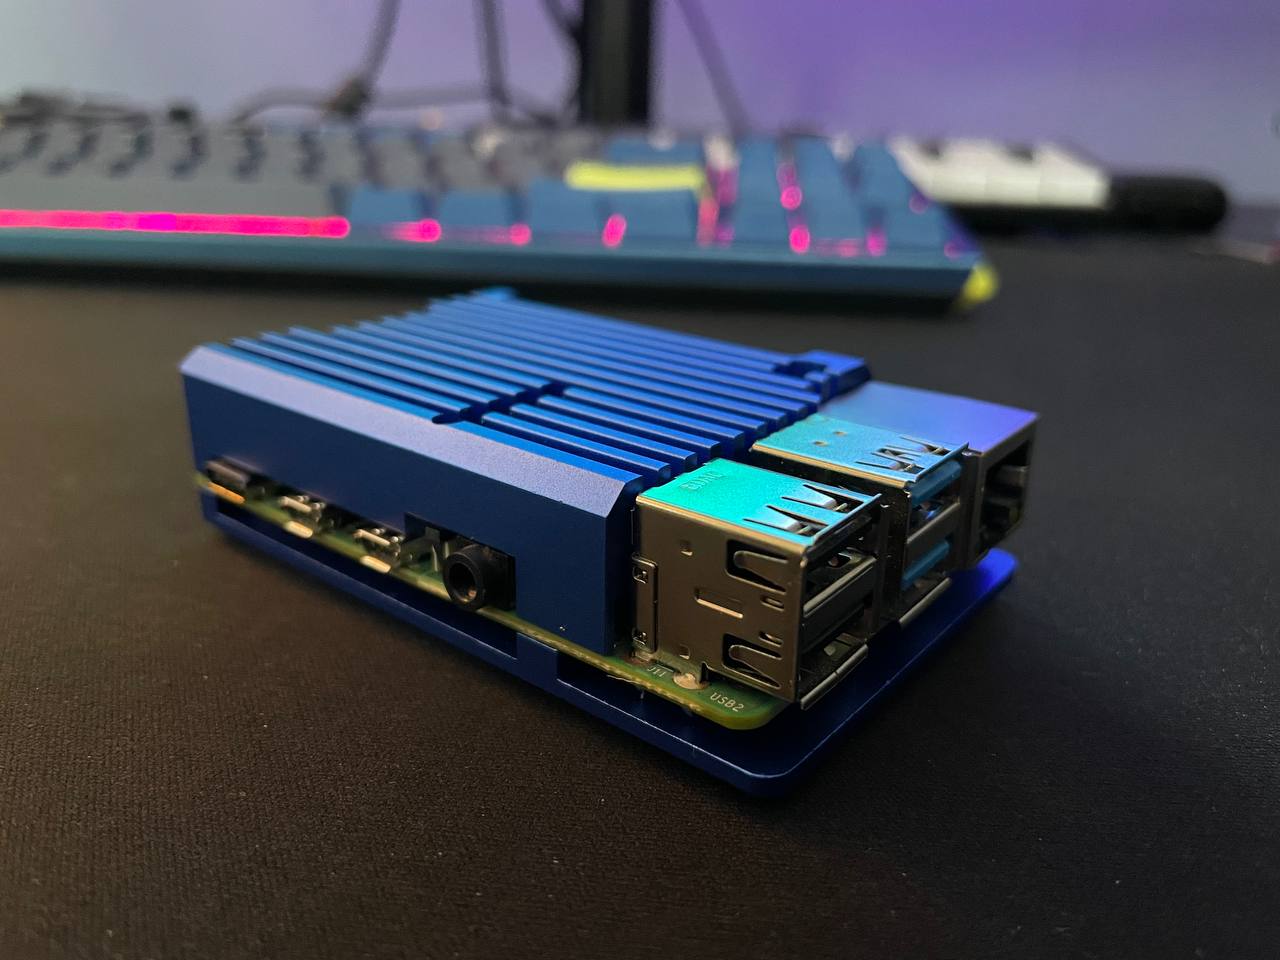
The ARM computer
Finding the right ARM computer to handle the actual streaming was a little bit of a gamble due to the actual hardware performance requirements. Despite that, I actually ended up using a Raspberry Pi 4 Model B, even though it's not fast enough for encoding. (I'll explain this decision more later.)
I also ordered a big heatsink for it because it was getting way too hot. The heatsink is very efficient at reducing CPU temperature.
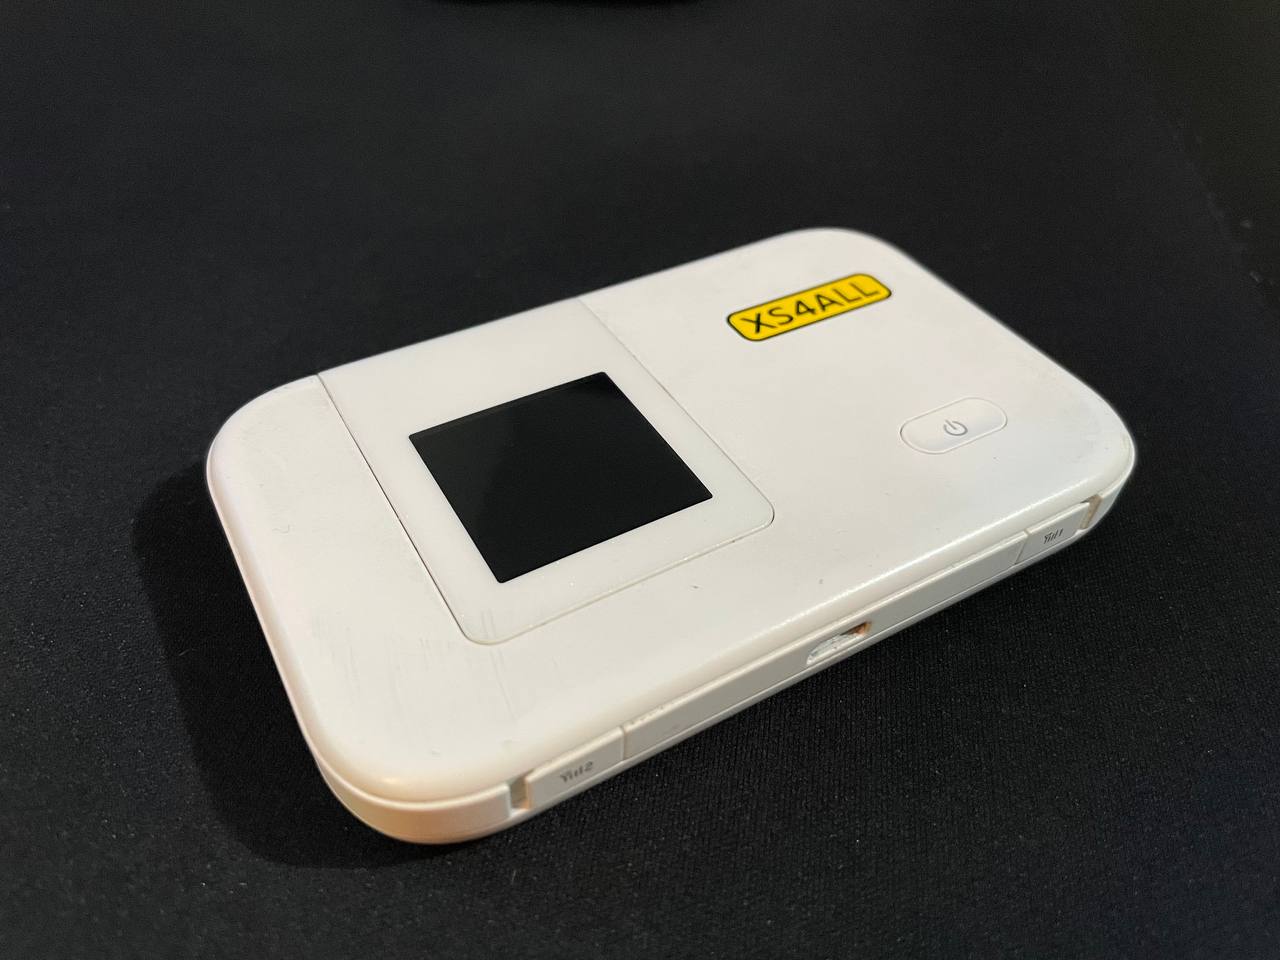
The 4G modem
I still plan to replace the one I am using now, but my dad still had an old 4G modem we got from our ISP, so I ended up using it for my testing. It's a Huawei E5372. It hosts a wifi hotspot, but it also supports a wired network interface when connected through USB.
The battery pack
This one isn't very complicated, you can use any big battery pack with a USB output. It just needs to have enough amperage to power the Raspberry Pi.
Setting up the Raspberry Pi
Before jumping into the software and the actual streaming, I should mention how I have my network set up.
I am using Wireguard to create a VPN between the backpack, my home computer, my phone, and my server. This means I can connect every node in the network to all other nodes, allowing me to stream from the Raspberry Pi anywhere in the world directly to my server, and then pulling that stream into OBS on my home computer.
For example:
10.0.0.1Server10.0.0.2Raspberry Pi10.0.0.3Home PC with OBS10.0.0.4Phone
This also required making sure the Raspberry Pi had a proper date and time set, because Wireguard refuses to work otherwise. I had to make sure NTP was working properly by installing systemd-timesyncd, running sudo timedatectl set-ntp true, and modifying /etc/systemd/timesyncd.conf to add NTP server pools located in the Netherlands.
Connecting the modem
Connecting the modem via USB creates a network interface (prefixed with wwx). Enabling DHCP in the Pi's Netplan configuration gives us an IP address, which lets us route all traffic through 4G.
The Netplan configuration is simple, and just requires adding an ethernet config to /etc/netplan/10-network.yaml, followed by netplan generate && netplan apply:
network:
  version: 2
  renderer: networkd
  ethernets:
    wwx000000000000: # Put your actual interface name here
      dhcp4: yes
I spent some time trying to reverse engineer the firmware image of this modem, but as I had most of the things I needed from it, I haven't spent that much time in this area. There's a small documentation on the E5186 that I found while researching this modem, which seems somewhat compatible with the E5372 I have.
The API supports sending and receiving SMS messages, which will come in useful when dealing with the 10 GB per day limit on the Netherlands' "unlimited data" packages that are available. Their "fair use policy" limits data to 10 GB per day but allows incrementing that with 2 GB via SMS an unlimited number of times. Currently I haven't played around with this yet, but it's something I'm still planning to try.
Connecting the GoPro
The GoPro is connected via USB to the Raspberry Pi. Surprisingly, similarly to the modem, the USB interface of the GoPro camera provides a network interface (prefixed with enx) which allows communicating with it. Once you enable DHCP on the camera interface in Netplan, you can access its HTTP server, which is unofficially documented here.
To get the IP address of the GoPro, we take the IP address we were given by DHCP and replace the last part to 51. Then, to enable webcam mode, we can send a simple request:
$ curl http://172.24.129.51/gp/gpWebcam/START\?res=1080
Once webcam mode is turned on, it will make the GoPro broadcast a continuous RTSP stream on its network interface. We can then re-broadcast this stream to the server directly through ffmpeg:
$ ffmpeg \
	-i udp://@0.0.0.0:8554\?overrun_nonfatal=1\&fifo_size=50000000 \
	-c:v copy \
	-c:a aac -ar 44100 \
	-f rtsp rtsp://10.0.0.1:8554/stream
If you know ffmpeg at all, you'll immediately see that we are not actually encoding the video, we are just copying it (through -c:v copy). The GoPro encodes its own mpeg stream, so we don't necessarily have to encode it ourselves, and we don't need to use much of the Raspberry Pi CPU resources either, and can easily stream 1080p.
I am however re-encoding the audio (through -c:a aac -ar 44100) to get the smallest possible audio stream that still sounds good instead of the default, which saves a (tiny) little bit on bandwidth.
This is then being broadcast via RTSP to the server, which is running RtspSimpleServer.
I ended up reverse engineering the GoPro firmware (which helpfully has most of its debug symbols available!), to find out you can also use the API to configure the bitrate that the GoPro encodes at (and subsequently documented this in the unofficial documentation). This is useful when testing on a bandwidth limited data bundle.
$ curl http://172.24.129.51/gp/gpWebcam/SETTINGS\?bitrate=2000000
Unfortunately I have not yet found a way to enable camera stabilization. Perhaps this is possible through the separate "streaming" feature available through the API, but I have not tried that yet.
Alternatively if we do need to re-encode video at some point, we would have to get a more powerful ARM computer, such as the popular Jetson Nano. The Raspberry Pi can also encode, but in practice this is limited to a framerate of 15 FPS at 720p, and you might need a more complex cooling solution.
Writing the software
I had to write 2 different pieces of software:
- The encoder server for the Raspberry Pi (source code)
- An app for the iPhone to control the encoder server and OBS at home (source code)
The encoder server
This is the server code running on the Raspberry Pi. It maintains a connection between the GoPro, the server, and OBS. It runs ffmpeg to stream the GoPro footage, talks with OBS using obs-websocket, and provides an API for the iPhone app to talk with.
It's written in Go, and you can find the source code on Github.
The code is cross-compiled for ARM64 on any other platform (I've used both Windows and Mac for this), and then deployed through SSH to the Raspberry Pi itself. Technically this process would even be possible remotely, when the backpack is in active use and connected to 4G.
The iPhone app
I wanted to control the encoder server directly from my phone. This would let me mount my phone to my bike and still have everything that's happening on the Raspberry Pi visible. Some requirements that I wanted this app to have:
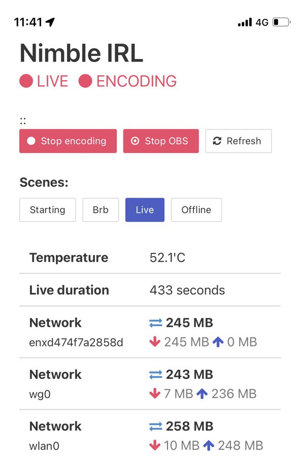
- See that each component in the backpack is still running
- See the current temperature of the Raspberry Pi CPU (it can get very hot)
- See the used network bandwidth in megabytes (I still only have a limited data package)
- Turn the GoPro on/off
- Turn the OBS stream on/off
The app is made with Capacitor and Vue2, and talks directly with the encoder server through the VPN. It's worth noting that the phone and the 4G modem are on separate networks, and are only connected through the VPN.
You can find its source code on Github as well.
To make sure I know what's happening at all times, I made sure that the app refreshes its data every 2 seconds, and clearly shows that it is refreshing, and shows an error if even the tiniest of things goes wrong. This way I know that everything still works.
All the data on the app goes directly through the encoder server's API requests. This includes the websocket to OBS, to start and stop the Twitch stream, change scenes, and get the current livestream's duration.
I was considering building a Twitch chat view as well, but there are other more established apps for that (Chatsen is the one I was using in my tests).
The following is a screenshot of a quick stream I did on Twitch to test the whole setup. It was streamed at a low bitrate at 480p because I didn't want to burn through all of my data in 1 go.
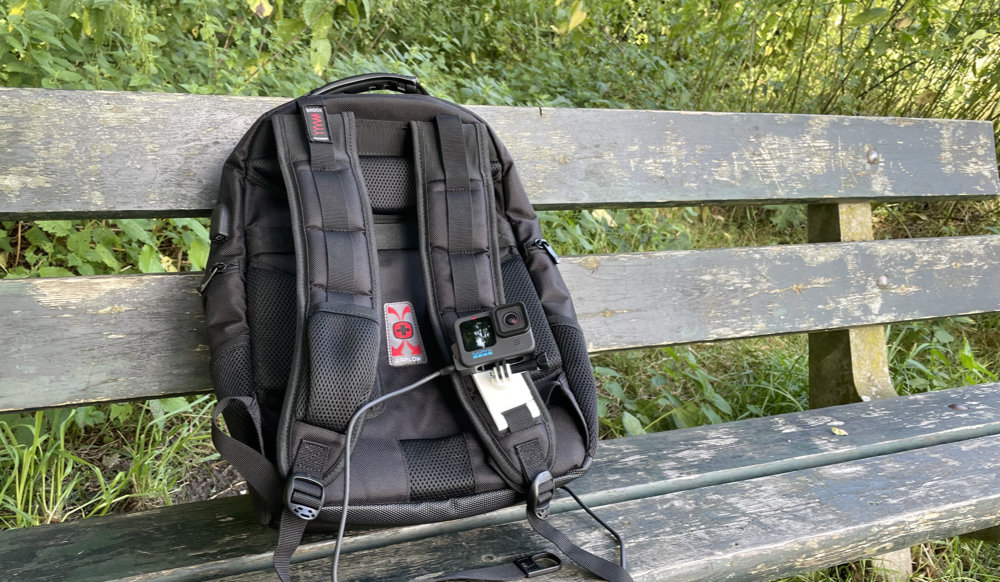
Mounting the GoPro
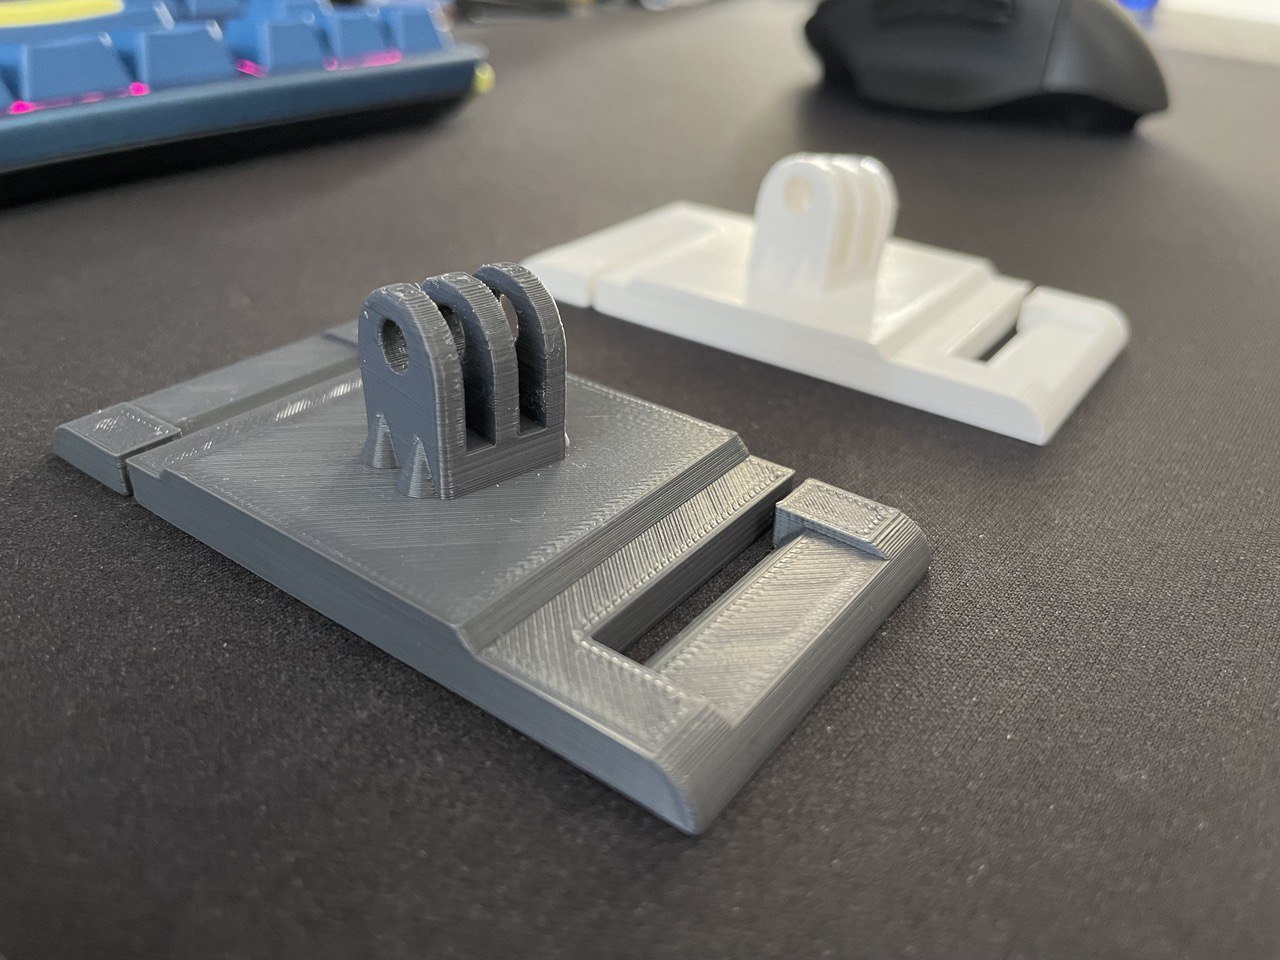
This was probably the hardest to get right (it's still not entirely great), because I wanted to mount it somewhere on my backpack that wasn't on my shoulder. Initially I wanted to use a tripod that I could fit in the handy shoulder pouch, but the tripod I had wasn't too sturdy and would move around a lot.
What I ended up playing around with is a number of different 3D printed mounts that my dad helped me design and 3D print. The final one we ended up at is a modified version of this backpack mount. We went through several iterations before we got it right. You can find all of the iterations on Tinkercad.
These fit on the long front straps of the backpack and can fit the mount point of the GoPro directly.
Fitting it all
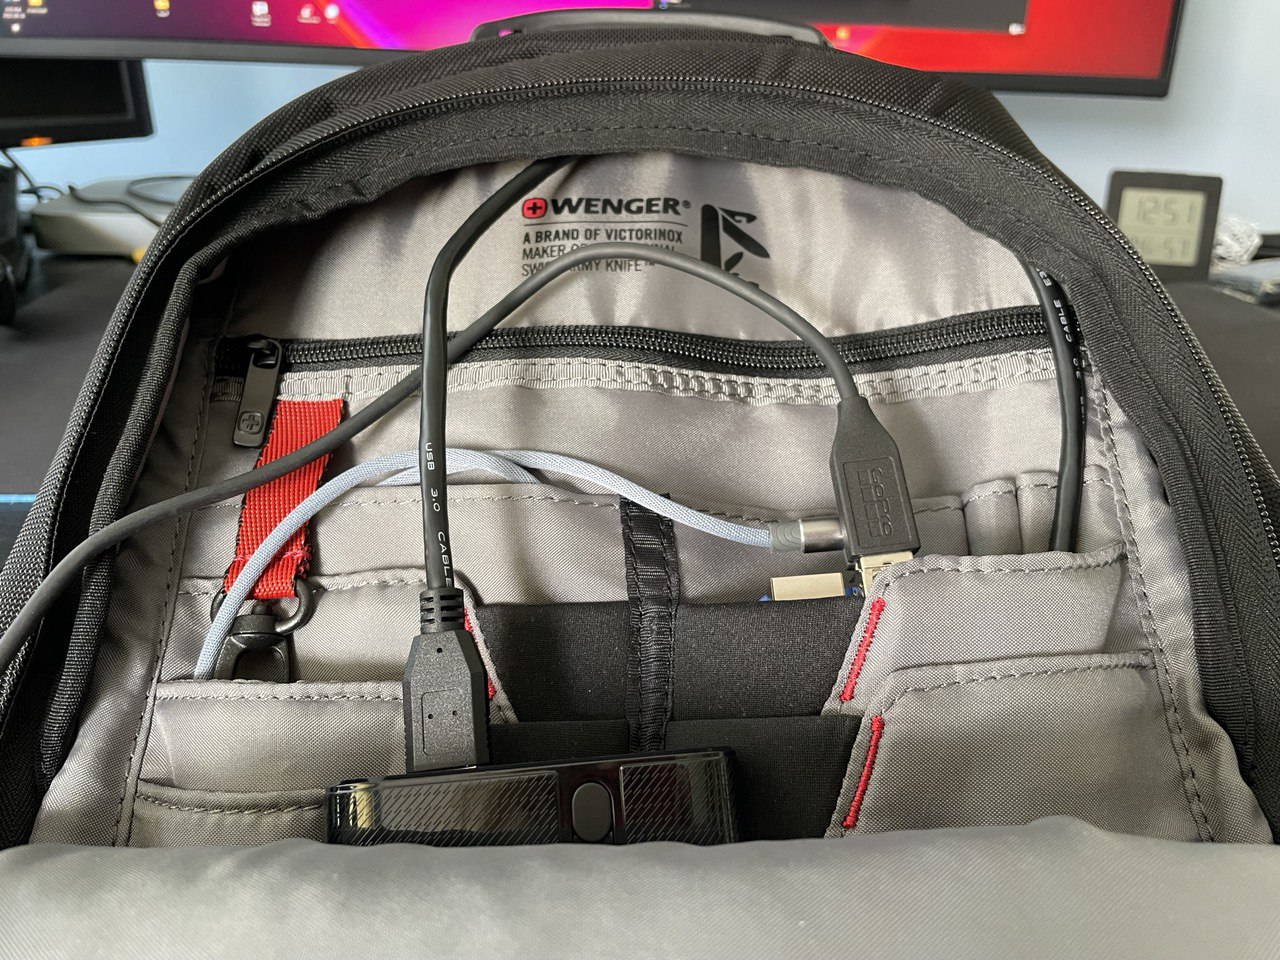
The last step was to fit it all inside of the backpack. I bought some specialized angled cables to connect the Raspberry Pi with the modem and the battery pack in a nice compact way. The camera is connected to the (longer) cable I got with the USB passthrough door, but any (non-angled) USB-C cable will work for this purpose as well.
I highly recommend Wenger backpacks, they have a very solid build quality and have a ton of little places to hide stuff in. I recently bought the Wenger Pegasus Deluxe after owning the non-deluxe version for over a decade. (Which is still in perfect shape!)
Conclusion
This was a fun DIY build! This is definitely very obviously a first iteration. I might improve on it in the future. Some points of improvement that I would like to see in the next version:
- Better cooling - perhaps a fan that blows hot air out of the backpack.
- A more fleshed-out phone app - currently it's a very quickly developed app purely to show what's going on and to quickly control stuff. This could have a lot more functionality. Perhaps even a built-in Twitch chat.
- Better camera mount - perhaps something that lets me rotate it in 2 axes instead of only 1 axis. Maybe some kind of quick-release too, to remove the camera from the mount very quickly.
- Better (more reliable) modem - I'm currently using an older modem which I do not really know the reliability of.
- Automated support of fair use policy "unlimited" data bundles.
- External microphone - the GoPro built-in microphone is decent, but I think an external audio interface could provide a lot better quality.
- See the battery pack percentage on the phone app.
Thanks for reading! :)